Tuesday 21 December 2010

Christmas Peppermint Bark


Finally it is that time of year again! I love Christmas and all the homemade goodies that it warrants making! One of my favourite things to make at this time of year is peppermint bark. To me, peppermint bark tastes like Christmas-minty chocolate and candy cane crunch! It makes a great gift, too and can be wrapped up beautifully. My recipe says that peppermint bark will keep for 2weeks in the fridge. Usually, I don't have it around for that long...but this year I decided to make it a week before I would need it. Well.....a week later it is still ok...but not as great. It's flavour is definitely subdued and I have decided to make a new batch to give as presents. Whilst this makes my family quite happy (they get to eat the rest of the first batch), it is pretty annoying to have to make a whole new batch! So, my advice is, make this a maximum of 3-4 days before you need it.

Here is my perfected recipe....


Peppermint Bark
(makes enough to cover 1 baking sheet)

500g good quality white chocolate
300g crushed candy canes
400g good quality bittersweet chocolate
4tsp vegetable oil
1 1/2 tsp peppermint extract

Cover a large baking sheet with foil.

Stir bittersweet chocolate in a saucepan on medium-low heat until melted. Add peppermint extract and 2tsp vegetable oil. Cool to lukewarm (about 5 mins). Pour onto foil and spread evenly using a spatula or some kind of flat kitchen tool. Refrigerate until cold-at least 25min. Score the chocolate with a fork halfway through the chilling time. Remove any excess bits of dark chocolate.

Stir white chocolate in a metal bowl over a saucepan of simmmering water (do NOT let the water touch the bottom of the bowl) until melted. Add 2 tsp vegetable oil. Remove from heat and cool to 110*F (if you don't have a candy thermometer, this takes about 10mins or so-just make sure it's not very hot anymore but still liquidy. it needs to be only a little bit warm). Pour the white chocolate over the bittersweet chocolate and tip the balking sheet so that the white choc covers all of the dark choc. Don't use anything to spread it as it will mix up the chocolates. Sprinkle with the candy cane bits and press these lightly into the white choc. Chill to just firm-about 20mins.

Lift foil and chocolate onto counter or chopping board. Cut into 2inch strips. Cut each strip into 3 or 4 rectangles. Cut each rectangle into 2 triangles. (obviously you can make them whatever shape you want!)

Chocolate must be kept in the refrigerator!


I like to wrap peppermint bark up in Christmassy cellophane, tied close with red and green ribbons.

Sunday 28 November 2010

November Daring Bakers Challenge: Crostata!

The 2010 November Daring Bakers' challenge was hosted by Simona of briciole. She chose to challenge the Daring Bakers' to make pasta frolla for a crostata. She used her own experience as a source, as well as information from Pellegrino Artusi's Science in the Kitchen and the Art of Eating Well.

I have to say, I was not very excited about this challenge. I love making pies -but I tend to stick to my very reliable pastry recipe and prefer not to experiment with new ones. I also felt that I wanted something more exciting than a tart. After completing the challenge, I have to say that I am SO glad that I did it. The pasta frolla was AMAZING and is now a permanent addition to my recipe collection. This recipe for it turned out great-it seemed a perfect consistency-no sogginess or crunchiness. I chose to use a Martha Stewart apple tart filling which was also very good. This combination resulted in a wonderful dessert that was perfect for a cold November evening.


Apple Crostata with Pasta Frolla

Ingredients:

For the Pasta Frolla

1/2 c. minus 1 Tbsp caster sugar
1 3/4 c. all purpose flour
1/4 tsp salt
1 stick (4oz.) cold unsalted butter, cut into small pieces
1 large egg and 1 large egg yolk, slightly beaten

For the Apple Filling:

4 apples (such as Braeburn), peeled, cored and sliced into 1/2-in. thick wedges
1/2 c. minus 1 1/2 Tbsp sugar
2 Tbsp all purpose flour
2 Tbsp lemon juice
1/2 tsp ground cinnamon
Optional: 1/4 c. preserves, warmed

To make the pasta frolla:

Whisk together sugar, flour and salt in a bowl.
Rub or cut the butter into the flour until the mixture resembles coarse crumbs.
Make a well in the centre of the mounded flour and butter mixture and pour the beaten eggs into it (reserving about a tsp for glazing later-place in the refrigerator, covered until ready to use).
Use a fork to incorporate the liquid into the solid ingredients and then use your fingertips.
Knead lightly just until the dough comes together in a ball.
Shape into a flat disk and wrap in plastic wrap. Place in the refrigerator and chill at least 2 hrs. You can refrigerate the dough overnight.

To make the apple filling:

Toss together the apples, sugar, flour, lemon juice and cinnamon.

Assemble and bake the crostata:

Heat the oven to 375*F (190*C).
Take the pasta frolla out of the fridge, unwrap it.
Lightly dust teh top of the dough and your work surface with flour. Keep some flour handy to dust the dough as you go along.
If the dough is very firm, start by pressing it with the rolling pin from the middle to each end, moving the rolling pin by a pin's width each time. Turn the dough 180 degrees and repeat. When it softens, start rolling.
Roll the dough into a circle about 1/8th in. thick and transfer to tart pan.
Trim excess dough. Press the dough around the border into the sides of the pan, making sure there is an even thickness all the way around. Optional: leave an inch of dough to fold over the filling.
Prick the bottom of the dough with a fork in several places.
Add the apple filling.
Brush the border of the dough with the reserved beaten eggs.
Put the tart in the oven and bake 25-35min.
After 25min, check the tart and continue baking until it is golden.
When done, remove from oven and let cool. Make sure the tart is completely cool before slicing and serving.


Monday 1 November 2010

Daring Baker's October Doughnut Challenge

The October 2010 Daring Bakers challenge was hosted by Lori of Butter Me Up. Lori chose to challenge DBers to make doughnuts. She used several sources for her recipes including Alton Brown, Nancy Silverton, Kate Neumann and Epicurious.

This was the first Daring Baker's challenge I have participated in. It was great-I would never have tried making doughnuts....deep frying kinda scares me. So, I am really glad that this challenge came up and that I faced my fear of scalding hot oil!

I decided to make the traditional yeast doughnuts which was an Alton Brown recipe. They were soooo yummy! I made a few alterations to the original recipe after reading a few reviews and I think these changes were great. You can see the original recipe by clicking the link below. They really do need to be eaten within a couple hours as they loose their crispiness pretty quickly!

Yeast Doughnuts

Recipe from Alton Brown (Food Network)

Prep time:
Hands on prep time: 25min
Rising time: 1.5hrs
Cooking time: 12min

Yield: 20-25 doughnuts, depending on size.

Ingredients

1.5 cup milk
1/3 cup vegetable shortening
2 pkgs (4.5tsp) Active Dry Yeast
1/3 cup warm water
2 large eggs, beaten
1/3 cup granulated sugar
1.5 tsp salt
1 tsp cinnamon
23oz plain flour
Vegetable oil- enough to fill your frying saucepan/dutch oven 3in deep.

Directions:

Place milk in a medium saucepan and heat over medium heat, just until warm enough to melt shortening. Place shortening in a bowl and pour warmed milk over. Set aside.

In a small bowl, sprinkle the yeast over the warm water and let dissolve for 5 min. It should get foamy. After 5 min, pour the yeast mixture into a large bowl of an electric mixer and add milk and shortening mixture (ensure the milk mixture has cooled to lukewarm).

Add the eggs, sugar, salt, cinnamon and half the flour. Using the paddle attachment of your mixer, combine the ingredients on low speed until the flour is incorporated. Increase speed to medium and beat until well combined. Add remaining flour on low speed and then increase to medium speed and beat well.

Change to the dough hook attachment of the mixer and beat on medium speed until the dough pulls away from the bowl and becomes smooth (3-4min). The dough will be wet- do not add more flour.

Transfer to a well-oiled bowl, cover and let rise for 1 hr until doubled in size.

On a well-floured surface, roll out the dough to 3/8in thick. Cut out dough using a 2.5 in round cutter and a 7/8-in. ring for the center hole (I used an apple corer).


Set on a floured baking sheet and cover lightly with a tea towel. Let rise for 30min.


Preheat the oil in a deep fryer or Dutch oven to 365*F/185*C. Gently place the doughnuts into the oil, 3 to 4 at a time. Cook for about 45 seconds per side until golden brown. Transfer to paper towels on a cooling rack. Allow to cool for 15-20min prior to glazing, if desired.


Chocolate Doughnut Glaze
Makes enough to glaxe 20-25 doughnuts.
Ingredients
1/2 cup butter
1/4 cup whole milk
1 Tbsp light corn syrup/golden syrup
2 tsp vanilla extract
4 ounces of bittersweet chocolate, chopped.
2 cups confectioners' sugar, sifted.
Directions
Combine butter, milk, corn syrup and vanilla in a medium saucepan over medium heat until butter is melted. Decrease heat to low, add chocolate, and whisk until melted.
Turn off heat, add the powdered sugar, and whisk until smooth. Place the mixture over a bowl of warm water and dip the doughnuts immediately. Allow the glaze to set for 30min before serving.


These dougnuts were really, really good. The cinnamon gave them a slightly deeper flavour and they were not too sweet. The glaze provided the perfect amount of sweetness and tasted amazing! These doughnuts were actually dangerous for me to have around- I ate way too many.


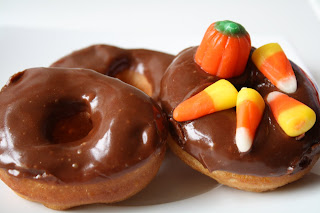
And since I made them on Halloween, I decided to decorate a couple with candy corn....


Overall, a really fun challenge and a highly recommended recipe!!

Saturday 9 October 2010

Cake Balls!

I have been a fan of Bakerella's blog for awhile. Her cake pops look amazing and she is always coming up with new decoration ideas. I'm not so good at the decoration side of things but I still wanted to try making these just for the taste and the novelty of them. I don't normally like to cook with cake mix or canned frosting, but I thought it was worth a try and I didn't have enough time to make everything from scratch. They were GOOD and everyone seemed pretty intrigued by them! I highly recommend them!

Cake Balls

Ingredients (makes about 50)
1 box of cake mix, cooked as directed for a 13x9 cake
1 can frosting (16oz)
1 package white chocolate bark (I used about 900g)
1 package regular chocolate bark

When cake is completely cooled, crumble into a large bowl. I used chocolate cake mix but you can really use whatever flavour you like.

Mix throughly with the can of frosting. I used vanilla, but again, use whichever flavour you want. It is easiest to mix it with your fingers.

Roll mixture into balls that are roughly 1 inch in diameter and lay on baking sheet.

Chill for several hours or freeze for 60minutes.

Melt the white chocolate in the microwave (this chocolate is best worked with in batches, as it tends to set quite quickly).

Roll balls in the chocolate, tapping off excess. Place balls on wax paper until chocolate has set. They may need a second layer of chocolate.

Melt the regular chocolate bark and drizzle over the balls with a spoon. These do not need to be refrigerated, but they can be if you would prefer them cold.

Recipe adapted from Bakerella


This is a picture of the inside of the cake ball. Sooooo yummy.

Sunday 3 October 2010

Mini Apple-Cinnamon Loaves with Calvados Glaze


This is a favourite recipe of mine. And now that it's October, I felt like it was time to have this again. It is a really great apple loaf cake recipe. Perfectly spiced, not overly sweet, with chunks of apple that are perfectly tender. The glaze is also amazing and worth making (it's also very easy to make!) It adds some richness to what is quite a light loaf cake.


Mini Apple-Cinnamon Loaves with Calvados Glaze

Ingredients

Loaves:
1 cup pecans
1 1/4 cup vegetable oil
1 1/2 cups sugar
2 large eggs
1 tsp vanilla
3 cups plain flour
1/2 tsp cinnamon
1/2 tsp nutmeg
1/2 tsp baking soda
1 tsp salt
3 cups peeled, cored, diced apples (about 3 large apples)

Glaze:
1/4 cup unsalted butter
1/3 cup packed light brown sugar
1 Tbsp golden syrup (or light corn syrup)
1 Tbsp Calvados

To make the bread: Preheat oven to 350*F. Arrange pecans in a single layer on baking tray and bake 10min until golden and aromatic. Cool the nuts and then coarsely chop.

Grease and flour five 6x4x2-inch mini loaf pans. Whisk together the oil, sugar, eggs and vanilla in a large bowl. In a separate bowl, combine the flour, cinnamon, nutmeg, baking soda and salt. Stir the flour mixture into the oil mixture until incorporated. Stir in the apples and pecans. The batter will be stiff and difficult to stir.

Spoon the batter into the loaf pans, filling each about 3/4 of the way full. Bake for 50min to 1 hr until a toothpick inserted into the centre comes out clean. Cool loaves in the pans for 10min and then turn them out onto baking racks.

To make the glaze: Melt the butter, brwon sugar, syrup and Calvados in a saucepan set on medium-high heat for about 2 min until slightly thickened. Spoon the warm glaze over the loaves.

Do not wrap them until they are thoroughly cooled and the glaze has set, about 1 hr. Wrapped bread will keep up to 4 days at room temperature.

Adapted from the Pastry Queen cookbook


Here is a picture of one of the loaves in the pan:


Here is the loaf before covering it in glaze:


Here is a picture of the glazed loaf cut in half. Sooo yum

Thursday 30 September 2010

White Chocolate and Toasted Pecan Blondies


I LOVE blondies. To me, they taste like cookie dough...but are considered more "acceptable" to eat lots of! I've experimented with lots of different add-ins, but this is probably the one that gets the best reaction. Keep an eye on these while they are baking. Mine tend to take a little bit longer than specified in the recipe, but it's really important not to overbake them!!

White Chocolate and Toasted Pecan Blondies
Makes 24 2-inch Blondies

Ingredients
1 1/2 cups cake flour (not self-rising)
1 tsp baking powder
1/4 tsp salt
3/4 cup (6oz) butter, softened
1 cup firmly packed light brown sugar
1/2 cup granulated sugar
2 large eggs at room temperature
3 tsp vanilla extract
1 cup pecan halves
1 1/4 cup white chocolate

Preheat oven to 350*F

Grease and lightly flour a 13x9 inch baking pan.

Toast the pecans: Place pecans on baking sheet and bake for 15mins, until lightly browned and fragrant. Let cool and then chop coarsely.

In a small bowl, combine the flour, baking powder, and salt. Set aside.
In a large bowl of an electric mixer, cream together the butter and sugars until smooth, about 2min. Add the eggs and vanilla, and beat well. Add the dry ingredients and mix until just combined. Stir in pecans and chocolate.
Spread the batter evenly in the prepared pan. Bake for 35-45min, until a cake tester inserted in the centre comes out with moist crumbs attached. Do not overbake.

Allow to cool to room temperature before cutting and serving.

Saturday 18 September 2010

Garden Party Cupcakes

So, I was given the task of making cupcakes for a garden themed party this week, and here is the finished product:

I made mini cupcakes and normal sized ones. All of the pictures feature mini cupcakes. They were vanilla cupcakes with vanilla frosting. I dyed the frosting a pale green and put sugar flowers on top. I used a cupcake recipe adapted from Billy's Cupcakes which I found on the Martha Stewart website and a Martha Stewart recipe for frosting. They are really light cupcakes which have a soft texture. The frosting is really fluffy and very easy to make!


Billy's Vanilla Cupcakes (Makes approx 30)

Ingredients for cupcakes

1 3/4 cup cake flour
1 1/4 cup plain flour
2 cups sugar
2 Tbsp baking powder
3/4 tsp salt
1 cup butter at room temperature
4 large eggs
1 cup whole milk
2 tsp vanilla extract

Ingredients for Frosting

1 1/2 cups butter at room temperature
4 cups (1 pound) confectioner's sugar, sifted
1 tsp vanilla extract
Green food coloring

Sugar flowers to decorate

Directions

Preheat oven to 325*F. Line cupcake pans with paper liners and set aside. In a bowl of an electric mixer, combine flours, sugar, baking powder, and salt. Mix on low speed until combined. Add butter in small pieces, mixing until coated with flour.

Add eggs one at a time.

In a measuring cup, whisk together milk and vanilla. Add wet ingredients in 3 parts, scraping down sides of the bowl before each addition. Beat until ingredients are just incorporated. Do not overbeat.

Divide batter evenly among linrs, filling about 2/3 full. Bake, rotating pans halfway through, until a cake tester insterted in the center comes out clean, 17-20 min.

Transfer to a wire rach to cool completely. Repeat process with remaining batter. Once cupcakes have cooled, frost each one.

To make the frosting: With an electric mixer, beat butter on medium-high speed until pale- about 2 min.

Reduce speed to medium and add confectioner's sugar, a little at a time, beating well after each addition.

Add vanilla and beat until smooth and fluffy. Add in food coloring a little at a time until desired color is achieved. Decorate by pressing sugar flowers into frosting.

Can be refrigerated up to 10 days in an airtight container. Before using, bring to room temp and beat on low speed until smooth again-about 5 min.


I was really pleased with how these turned out. I love these recipes and use them often. I really wanted the cupcakes to go along with the garden party theme and I think I was able to achieve that with these.

Tuesday 7 September 2010

Peanut Butter Chocolate Cupcakes

Today I decided to try out another recipe found on Annie's Eats blog.... Chocolate cupcakes with a peanut butter filling and frosting. Here are the results:


Dissected cupcake showing the peanut butter filling:


Same cupcake, different style frosting:


Overall, these cupcakes were a great success. They were pretty easy to make apart from having to clean the mixing bowl 3 times. The cake was really moist with a perfect chocolate flavour. The frosting was a really good peanut butter flavour with a hint of cream cheese sourness to balance out the sugar. The frosting was a little soft and liquidy for my liking (I prefer the look of frosting that is a little stiffer) but it tasted great. By far the best part of these cupcakes was the peanut butter filling. It tasted a lot like the filling in Reese's and I had to stop myself from eating it all just on it's own!! The filling is what made this cupcake special. I would happily make these again.


Peanut Butter Chocolate Cupcakes (makes 24 although I ended up with 20)

Ingredients
:

For the filling:
1cup confectioners’ sugar
¾ cup creamy peanut butter
3-4 tbsp. unsalted butter, at room temperature
½ tsp. vanilla extract

For the cake:
1 2/3 cups all-purpose flour
¾ cup unsweetened cocoa powder
1 tsp. baking soda
½ tsp. salt
1 cup sour cream
2 tbsp. milk
1 tsp. vanilla extract
8 tbsp. unsalted butter, at room temperature
1½ cups sugar
2 large eggs

For the frosting:
8 oz. cream cheese, at room temperature
4 tbsp. unsalted butter, softened
½ cup creamy peanut butter
3¼ cups confectioners’ sugar
1 cup frozen whipped topping, thawed


Directions:

Preheat the oven to 350° F. Line two cupcake pans with paper liners.

To make the filling, with an electric mixer, beat confectioners’ sugar, peanut butter, butter and vanilla extract in a bowl until well combined. Roll the mixture into 1-inch balls (at least 24) and set aside on a baking sheet. Refrigerate balls until firm.

To make the cake batter, combine the flour, cocoa powder, baking soda and salt in a medium bowl and set aside. In a measuring cup, stir together the sour cream, milk and vanilla extract. In the bowl of an electric mixer fitted with the paddle attachment, beat the butter and sugar on medium-high speed until light and fluffy, about 2 minutes. Beat in the eggs one at a time, scraping down the bowl as needed. With the mixer on low, alternately add the dry ingredients and the sour cream mixture, beginning and ending with the dry ingredients. Mix just until incorporated.

Spoon a tablespoon or two of batter into the bottom of each cupcake liner. Place a ball of the peanut butter filling in each cupcake well and top with the remaining batter so that all the cups are filled. Bake for 18-22 minutes, or until a toothpick inserted in the center comes out clean. Allow to cool in the pan for 5-10 minutes, then transfer to a wire rack to cool completely.

To make the frosting, in the bowl of an electric mixer fitted with the paddle attachment, combine the cream cheese, butter and peanut butter until smooth. Slowly mix in the confectioners’ sugar, beating until smooth and well blended. Mix in the whipped topping until smooth and fluffy. Frost cooled cupcakes as desired.

Keep cupcakes refrigerated.

Source from: adapted from
Annie’s Eats,
originally from Good Housekeeping


Monday 6 September 2010

Another year...

I am clearly pretty bad at this blogging thing. I am back in America and thought it would be a good time to update....and to vow to be a better blogger.....hopefully.


Over the past few months I have baked lots of new things. Let's start with the most recent: Chocolate chip cookie dough cupcakes from Annie's Eats. I have recently discovered her blog and she has some AMAZING recipes!! These cupcakes were so awesome!


I also made some scones which overall I wasn't super impressed with. I will have to keep searching for the perfect scone recipe.


I made some bagels for my guy. Their texture was awesome but I forgot the salt! He was very sweet about it and ate most of them anyway! The recipe was from the Nigella Lawson Domestic Godess cookbook.


I also decided to try out making my own jam. Surprisingly, this was a total success. I used strawberries that we picked ourselves and I have never tasted such wonderful jam! I am still trying to work out the whole canning process though.


A few months ago I devoted an entire evening to developing the perfect vanilla cupcake recipe. I made 3 different kinds and think I came up with a winner. It does seem to be a little temperamental though and when I tried to make it in America, it wasn't too successful. I think I need to work on it a little more.


So, a pretty good few months of baking. And I promise, promise, promise to be a better blogger!